Using GitHub to Backup RPG Maker Projects, or Anything Else,

GitHub is Now Accepting Bigger Project Repos
It recently came to my attention that GitHub, at a recent point, increased the size of backups they allow on their site. As of the time of posting this blog, users can have 10 gigabytes of storage for free hidden repos. Hidden repos are repos that designated collaborators and repo owners can only see.
Why is this significant?
In the past, Repos that were public had higher size limits for projects. This encouraged the open exchange of information between good-willed open-source contributors, ultimately making the internet a better place. Unfortunately, not all open-source projects are benevolent, and not all non-public projects originate from evil intent.
Game development projects often require a closed environment to prevent leaks, theft, tampering, and a myriad of other potential problems present in game dev. Game dev projects also require larger file sizes than utility apps because games have more assets. Thus, for years, game devs would not have access to many tools that regular app and web developers took for granted. No longer!
Video Version of this Post
Tutorial: Back Up Your game on GitHub
Before we start, I want to point out that we will not be using CLI (Command Line Interface) in this tutorial because I’m assuming you are not familiar with CLI if you use a tutorial like this one. Also, this tutorial was made with windows, but I would assume the same process would work on other operating systems; please let me know if you are having trouble on Mac OS or Linux.
- Create a GitHub Account: https://github.com
- Download and Install GitHub Desktop: https://desktop.github.com/
1. Link you GitHub account to GitHub Desktop Application
First confirm that you are logged into the GitHub website on your computer’s default browser. Open GitHub Desktop and goto File > Options and click the ‘Sign in’ button. Click the button that says, ‘Continue with browser.’
This tutorial assumes you are using the free version of GitHub, but if you have the premium version, GitHub Enterprise, the following directions will still work.
2. Create an Empty Repository
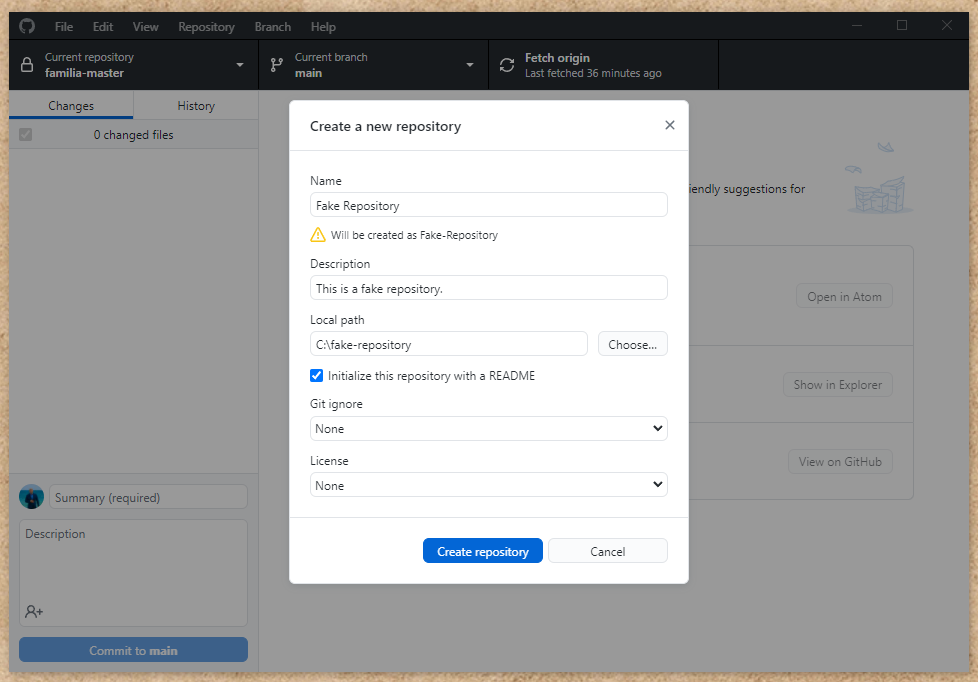
In the GitHub Desktop app, go to File menu > New Repository. Fill out the name on the description with whatever you wish.
I recommend creating an empty folder for now. We will move your project into the folder after the repo is created. At this stage, whatever folders you make will be your actual repo’s parent. Thus, the picture example, ‘C:\fake-repository,’ will still have an additional folder in it. The folder inside the parent will be the root of the repo.
I recommend clicking the checkbox that says, ‘Initialize this repository with a README.’ For now, you are most likely fine leaving ‘Git ignore and ‘License’ set to ‘None.’

Next, click ‘Publish repository.’

Since this tutorials is specifically more intended for RPG Maker devs, and game devs in general I recommend that you keep your code private. Go ahead and click ‘Publish repository’ on the window that popped up after the first ‘Publish repository’ button.

3. Add Game Files to Project Folder
Next, get your RPG Maker game files and put them into the folder that was created.
I prefer to put my game’s root folder contents right into my repo but you may want to put your game in a folder in your repo. The second option might be preferable if you would like to store assets or code that is not stored directly in your game. Perhaps you have unfinished content you don’t want in your actual game directory. However be careful of making your directory too large. With my project, for example, I would really bog down the backup process with dozens of gigs if I uploaded all my asset files.
4. Push New Files to Your GitHub Repository
If you put the files in the right spot, you will see something like this in the GitHub Desktop app.
If you don’t see this change in the GitHub Desktop app, take a second to check that you put the files in the correct directory. When I first did this, I put my files into the parent folder and not the actual folder I designated in the app.

From here, you just have to name your summary in the bottom left and click ‘Commit to main.’
Depending on the size of your project, this could take awhile. For me, It failed a few times because my internet was unstable. Just try again and it will work eventually.
5. Double Check to Make Sure Your Repo is Up
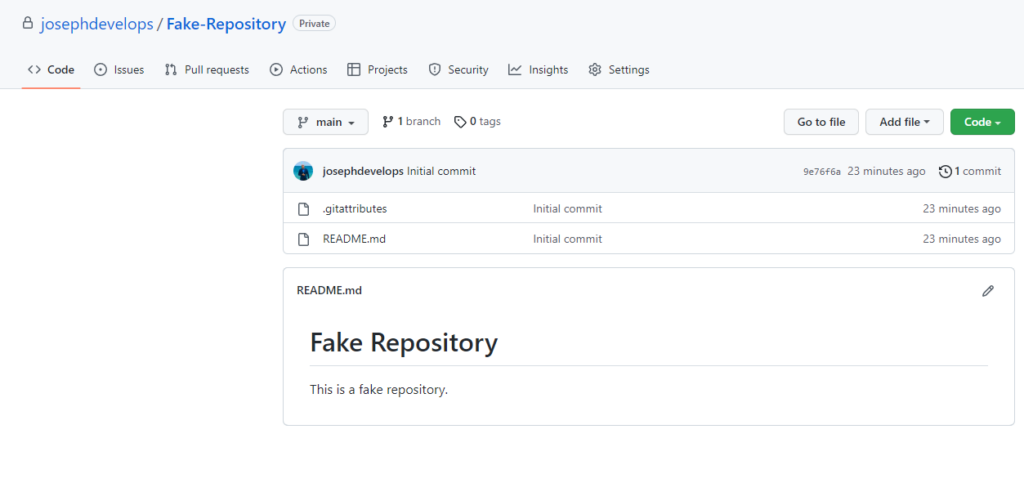
If you go back into your GitHub account on the GitHub website you should see a new repo.

That’s It
Thanks for checking out my tutorial. If you have any questions please contact me directly as I have disabled commends on this site.


